Showing posts with label brownie. Show all posts

Sunday, August 14, 2011

Nutella Brownies with Cheesecake Topping.

Nutella.  I almost guarantee that a.) you've never heard of it or b.) you've heard of it and love it.  True?


Let me clear the air though...  I do not fall into either of these categories.  I've know about Nutella and purchased it on occasion for many years.  But guess what - I don't love it.  (Gasp!)  It's true.  I like it just fine, but it is hardly anything that I would gush about.  (At least until this recipe).


My mom on the other hand...she loves it!  Recently she saw an ice cream recipe and asked if we could make it for her since she does not have an ice cream maker.  We agreed.  When my husband (previously falling to the "a" category above) went about making the ice cream, he too, fell in love with Nutella (category "b").  And now my husband can't get enough Nutella.

This is where the Nutella Brownies with Cheesecake Topping come into play.  I set out to find deliciousness involving Nutella.  And I found it.  These brownies have leaning towards the Nutella lover side of things.

Nutella Brownies with Cheesecake Topping.
(Recipe from Babble via Pinterest; Method Adapted by Me)

Brownie:
4 eggs
1 cup brown sugar
1/2 cup butter
3/4 cocoa powder
1/2 cup nutella
1/3 cup flour

Cheesecake Topping:
8 ounce cream cheese
1/2 cup nutella
1/2 cup sugar
2 eggs

Beat all of the brownie ingredients together.  Pour evenly into a greased 9x13 baking pan.  Using the same bowl, beat all of the cheesecake ingredients.  Carefully pour and evenly spread the cheesecake mixture over the brownie mixture.  Bake in a preheated 350 degree oven for 30-35 minutes.  Allow to cool completely.  This is necessary for the cheesecake to set.  Once cool: enjoy!!  Refrigerate any uneven brownies.

Sounds heavenly, right?  They are.  Oh, and did you notice how simple the recipe is?  And how few dishes will need to be washed?  I LOVE this recipe!

Sunday, March 6, 2011

Hot Cocoa Brownies.

One of my favorite food bloggers is Sugarplum.  I enjoy seeing what comes out of her kitchen and hearing her stories of food competitions and her desire to attend culinary school.  I even got to see her on TV a few times – thanks to the Food Network and my parents television!

 
Recently she posted a recipe for hot cocoa brownies.  How could I not re-create them – the name itself sounds delightful!  The recipe calls for an 8x8 pan which is perfect for a household of two!

Hot Cocoa Brownies
(Adapted from Sugarplum)
3/4 cup all purpose flour
1/2 cup unsweetened cocoa powder
1 teaspoon baking powder
1/2 teaspoon salt
6 tablespoons unsalted butter (melted)
3/4 cup granulated sugar
1 large egg
1/2 cup white chocolate chips
1 cup milk chocolate chips, divided
1 cup mini marshmallows

In a large bowl, mix together butter, sugar and egg until well combined. Add dry ingredients and mix just until combined. Stir in white chocolate chips and 1/2 cup milk chocolate chips.  Place batter into an 8x8 baking dish coated with nonstick cooking spray.  Top with remaining milk chocolate chips

Bake 20-25 minutes in a 350 degree oven.  Top with marshmallows, flattening them with your fingertips as you place them on top of the brownies.  Sprinkle cocoa powder over the top.


We enjoyed these with some vanilla ice cream.  They were the perfect mix of chewy with a slightly crunchy top.  The mix of milk chocolate and white chocolate chips was also added to the tastiness of these treats.  

Sunday, June 13, 2010

Sugarplum's Mayan Mudslide Brownies.

The wait for a recipe is so worth it today. These amazing little things are so good - even better paired with vanilla ice cream. Mmmm.


Mayan Mudslide Brownies
(adapted from Emily @ Sugar Plum)
1/4 cup butter
4 ounces Baker's semi-sweet chocolate (chopped)
1 teaspoon instant coffee mix
1 cup flour
2 tablespoons Hershey's unsweetened cocoa powder
3/4 teaspoon baking powder
1/4 teaspoon sea salt + 1/8 teaspoon sea salt
1 avocado (peeled & pitted) - trust me - it's OK!
1/2 cup granulated sugar
1/2 cup brown sugar
1 teaspoon vanilla
1 egg
1 cup semi-sweet chocolate chips
1 cup salted cashews
3/4 cup canned dulce de leche (I really hope you can find this ingredient. I could not, so I made my own "dulce de leche" with sweetened condensed milk. I tried baking it - it worked OK. I tried microwaving it - it worked GOOD but was a mess!! I think you could also use a caramel sauce....

Preheat oven to 375 degrees. Line an 8x8-inch baking dish with parchment paper.

Melt butter in saucepan over medium; turn heat off, add chopped chocolate and instant coffee. Stir until melted and smooth. Remove from heat and set aside.

In a separate bowl, stir together dry ingredients (including only 1/4 salt and excluding the sugars) until well combined. Use a mixer on medium speed to beat the avocado until creamy. Add granulated sugar and brown sugar. Beat until well combined. Beat in vanilla and egg then beat in the melted chocolate mixture until well combined. Slowly beat in dry flour mixture.

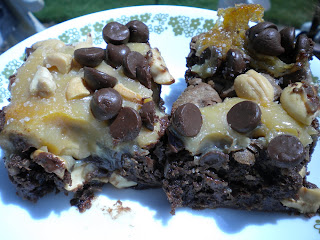
Spread batter in baking dish. Sprinkle half of the chocolate chips and half of the cashews over the the batter. Bake 15 minutes. Remove from oven and drizzle with warmed dulce de leche. Sprinkle with remaining chocolate chips and cashews. Sprinkle with remaining salt. Return to the over for an additional 10-15 minutes. Cool and
enjoy.


I really hope you try these!!! I know the avocado might be intimidating, but it is so worth it!!! So, so, so worth it! The sweetness, the saltiness, the chewiness. Yum.

Monday, September 7, 2009

College House Brownie Bars

After an extended absence for no better reason than being busy, I am back with a recipe for brownie/chocolate lovers. :)
I came up with these last night after wracking my brain for something new I could make for Lucas. He just completed his first week of his last year of college in Eau Claire and I finished my second week of my internship in Abbotsford, so for the extended weekend I headed to EC to visit.
Now, you have to understand that in the kitchen of four college-aged guys... the baking supplies are few and far in between... so, I did what I could. These would be even better if I had made homemade brownies rather than box mix - so, I challenge you try doing that as well. Either way, I will promise a delicious product!


College House Brownie Bars

1 pkg family size brownies (my personal favorite are Duncan Hines brand - Chocolate Fudge)
3/4 cup peanut butter - I used chunky but would personally recommend creamy (but Lucas liked the chunky)
1 egg
1/2 cup sugar
2 handfuls of M&Ms, chopped
4-5 Oreo Cookies, crushed
2/3 cup white chocolate chips

Follow the directions on the box and place in a greased 9x13 pan. Then, mix the peanut butter, egg and sugar together. Spoon globs onto unbaked brownies and then using a butter knife, cut mixture into brownies to create a swirled effect and so that there will be peanut butter in each bite! Top with remaining ingredients and add some additional ones if you wish! Bake about 5 minutes longer than box requires. Enjoy!

Sunday, May 31, 2009

Brownie Cupcakes.

I promise these are best tasting and easiest homemade brownies you will ever make. And, you make them in the form of a "cupcake." I love that this recipe makes a small batch (about eight brownies), but can easily be doubled, tripled, etc! Because they are individual every brownie is equally crunchy on top and deliciously moist and dense on the inside. AND, the add-ins or add-ons are endless.
Brownie Cupcakes.
1/2 cup each - butter, semisweet chocolate chips, sugar, flour
2 eggs
1/2 teaspoon vanilla extract

Melt butter and chocolate chips; stir until smooth. Use the microwave for melting - it goes fast! In a small bowl, beat eggs and sugar. Stir in vanilla and chocolate mixture. Add flour and mix well.

Fill paper liners two thirds full. Bake at 325 degrees for 20-25 minutes or until tops begin to crack. Remove from oven and cool. Like I said, these are perfect just like that. Or you can frost them or you could mix something in before making (oreos, pb cups, etc).

As I began to think of what kind of "cake" I would prepare for Gary's birthday I thought about these and I thought about ice cream cake (which I made last year)...and then, I was visiting Joy the Baker's Blog and knew I had to combine these brownies with ice cream, ganache, and whip cream.

I knew for sure I would need mint ice cream as that is Gary's favorite. And after browsing the freezer section I went with this Cappuccino Chip another option since I don't care for mint ice cream.


Happy Birthday Gary!!

Wednesday, May 27, 2009

Brownie Peanutbutter Cheesecake Trifle.

I enjoy my trifle bowl. I think it is fun to use! I like getting to see the layers of deliciousness. I've done layers of fruit with was very pretty and you could do a seven-layer salad. You could do something classic like strawberry shortcake. Or, you could make your family and friend happy with this deliciousness:


For lack of a better name I am calling it Brownie Peanutbutter Cheesecake Trifle. I suggest making it for your next potluck or get-to-gether. People will look at it and try a small scoop. They'll taste it and go back for a second helping guarenteed. I made it for one of my Memorial Day celebrations. It went over well and what was left Gary scarfed up this evening!


Brownie Peanutbutter Cheesecake Trifle.

1 - 9x13 pan of brownies with chopped chunks of peanutbutter cup added to the batter
1 - small box cheesecake flavored pudding
1 - container whipped topping
peanutbutter
chocolate fudge ice cream topping
peanuts
additional chopped chunks of peanutbutter cup

Prepare brownies from scratch or package. Cut into small chucks and divide into two groups. Layer first half into the bottom of trifle (or other dish). Prepare pudding mix - adding in about a cup of melted peanutbutter. Allow to soft set and layer over the brownies. Top with whipped topping, peanuts, pb cup chunks, and drizzles of peanutbutter and chocolate fudge. Top with remaining brownies, whipped topping, peanuts, pb cup chunks, and drizzles of peanutbutter and chocolate fudge. Refrigerate until ready to serve.